| Avertissement | ||
|---|---|---|
| ||
Cette procédure d'installation est tirée du blogue K2Underground. |
| Info | ||
|---|---|---|
| ||
Page reliée |
Installation Silverlight 5 depuis les GPO (group policy object ou stratégies de groupe)
There are a number of K2 components which leverages off Microsoft Silverlight. The K2 View Flow, K2 designer for SharePoint and the K2 smartform designer utilize Silverlight. So if you decide to expose one or more of these components to end users, they need to install Microsoft Silverlight on their machines first.
However in a number of corporate environments, users normally will not be able to directly download components and install them by themselves. So how do we automate this?
One of the easy ways to do this is to leverage off the deployment features in Group Policy Objects (GPOs). However, the Silverlight package is something that needs to be prepared before you can use it in a GPO.
Here are the steps that have been tested with Silverlight 5.0 in a Windows 2008 R2 domain:
- Download the Silverlight offline installer and save it to a location on your machine.
- Open a command prompt (Start > Run > Cmd) and navigate to your download location.
- Type Silverlight_x64.exe –x
- When prompted for the directory to extract the files. Leave the default and click Ok.
- Once the extraction is done, click OK. Type dir and press the Enter key to list the contents of the folder.

- Notice the Silverlight.7z file. Use any compression tool that supports 7zip archives to extract the silverlight.msp file into the same folder. E.g. Winzip, WinRAR, 7-zip.
- Now switch back to the earlier command prompt window and type msiexec /p silverlight.msp /a silverlight.msi
- Once the installer dialog has completed. Type dir and press Enter to list the contents of the folder.
- Once you have these files, the rest of the steps are pretty straightforward.
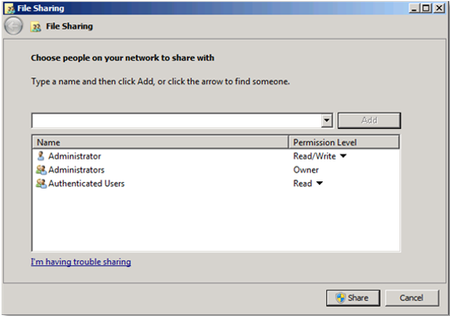
- Copy the binaries to an intranet file share.
- Give the required share and file folder read permissions to the share. I normally assign rights to Authenticated Users as this also includes Computers. This will allow you to install the package as soon as the machine boots up.
- Follow the Microsoft deployment guide to configure/assign the GPO software deployment package. For a quick summary of steps:
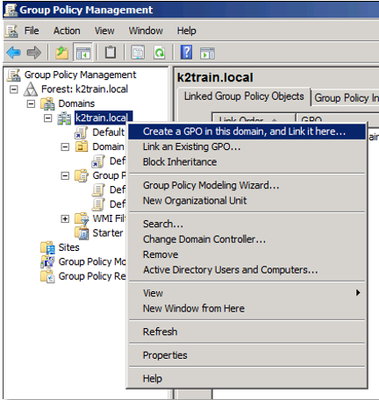
- On your domain controller, go to the Group Policy Management tool under administrative tools.
- Right click on your domain node and select Create a GPO in this domain, and Link it here...
- Give a name for the package in the New GPO dialog.
- Right click on the newly created GPO and select Edit.
- In the Group Policy Management Editor, navigate to Computer Configuration > Policies Software Settings > Software Installation.
- Select the silverlight.msi using the file share path (e.g. \\myfileserver\share\silverlight\silverlight.msi) and click Open.
- Ensure that the deployment method Assigned is selected then click OK.
- Now if we reboot one of your machines joined to the domain, the assigned package will be installed automatically.